 Foodofile
Bread's Worst Enemy: Avoid These Proofing Mistakes!
Yeast is a living organism. It reacts constantly to its environment. When you mix flour, water, salt, and yeast, you start a biological timer. The ambient temperature of your kitchen controls that timer. Mastering dough volume and achieving an airy crumb comes down to managing that heat. We see many bakers ignore ambient temperature. This oversight leads to dense loaves and collapsed crusts. Baking requires absolute precision. You must treat temperature as a measurable ingredient.
The Invisible Ingredient: Ambient Temperature
Temperature dictates the exact speed of fermentation. Yeast cells consume complex starches and expel carbon dioxide gas. This gas gets trapped in the gluten network. The trapped gas causes the dough to expand. Warmer environments accelerate this biological process. Cooler environments slow it down. The ideal temperature for proofing wheat bread dough sits strictly between 75°F and 78°F (24°C to 26°C). At this exact temperature range, yeast produces gas at a steady, manageable rate.
Bakers often chase speed. A fast proof seems convenient. A fast proof actually ruins the bread. When yeast ferments too rapidly, it outpaces the gluten development. The structural walls of the dough do not have enough time to organize and strengthen. You end up with a large volume of gas trapped inside very weak walls.
How Heat Changes Yeast Behavior
Yeast enzymes become hyperactive in warm conditions. If your kitchen hits 85°F (29°C) or higher, yeast produces gas exponentially. The gluten network cannot keep up with this rapid inflation. The dough inflates violently, but the structural integrity remains compromised. The gas bubbles merge and pop under the surface. This leads to a fragile dough that collapses the moment you score it with a lame or transfer it to a baking stone. A collapsed structure yields a flat, dense crumb.
Conversely, cold temperatures force yeast into a dormant state. Dough mixed with cold water or left in a 60°F (15°C) room will barely move. The fermentation slows to a crawl. While slow fermentation develops complex organic acids for flavor, a dough that is too cold during the bulk phase will fail to trap enough gas for an open crumb.
Hydration and Dough Structure
Water content changes how dough responds to temperature. High hydration doughs ferment faster than stiff doughs. The excess water allows yeast cells to move freely and access starches with ease. A dough mixed at eighty percent hydration requires meticulous temperature control. The extra water makes the gluten network highly extensible. Extensible dough stretches easily but tears if overinflated.
You build strength into these wet doughs through lamination and folding. Folding the dough during the bulk fermentation aligns the gluten strands. This mechanical action creates layers. Strong layers trap the carbon dioxide efficiently. If the ambient temperature is too warm, the dough ferments before you can complete the necessary folds. You miss the window to build structural integrity. The result is a puddle of dough that refuses to hold its shape.
The Goldilocks Zone for Airy Crumb
Dough volume directly correlates to a properly timed proof. You want the dough to expand outward and upward. It must fill with gas while retaining enough elasticity to spring up in the hot oven. When you proof dough at the 75°F to 78°F sweet spot, the gluten has time to relax and stretch without tearing. This precise timing creates an even distribution of air pockets.
An airy, open crumb requires strong, well developed gluten walls holding onto trapped gas. We call these pockets alveoli. Evenly distributed alveoli indicate a perfect balance between gas production and gluten strength. The heat of the oven causes the trapped gas to expand rapidly. The yeast goes into a final feeding frenzy before dying off at 140°F (60°C). This final expansion is called oven spring. A perfectly proofed dough maximizes oven spring to create a towering, airy loaf.
Reading Your Dough: The Poke Test
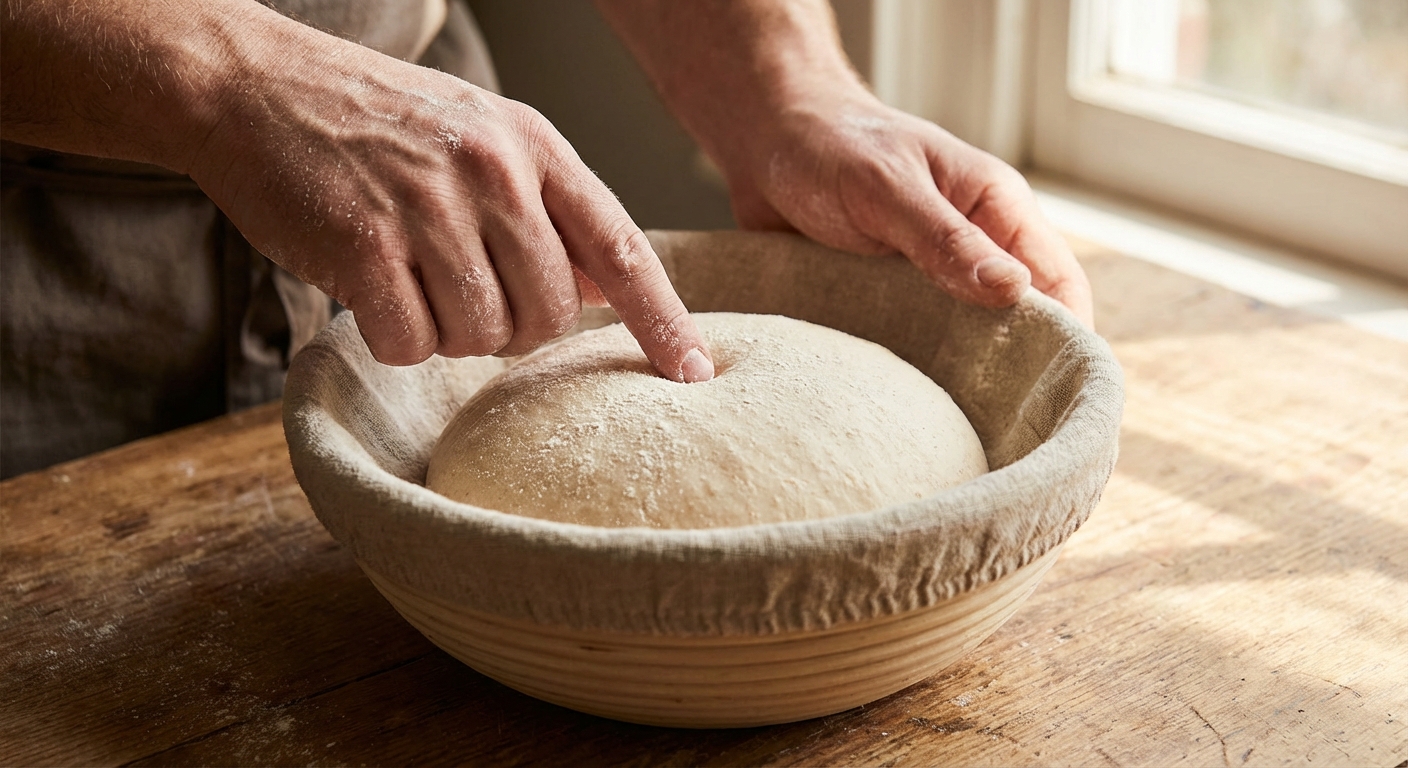
Bakers use a precise tactile method to gauge fermentation progress. You press your forefinger about half an inch into the surface of the resting dough. The speed at which the dough springs back tells you exactly what is happening inside the gluten network. You should lightly flour your finger before testing to prevent sticking.
Recognizing Underproofed Dough
Underproofed dough feels tight and exceptionally dense. When you poke it, the dough springs back immediately and completely fills the indentation. The yeast has not produced enough carbon dioxide to stretch the gluten. The dough structure remains highly elastic and tense.
If you bake underproofed dough, the yeast experiences a massive burst of energy in the hot oven. The crust begins to dehydrate and set in place. The yeast continues to produce gas inside the rigid crust. The pressure builds until the bread violently tears open at the weakest points. The resulting loaf looks misshapen and features a tight, gummy interior.
Recognizing Overproofed Dough
Overproofed dough feels highly aerated and extremely fragile. It jiggles heavily when you move the proofing basket. When you poke the surface, the indentation stays completely depressed. The dough does not spring back at all.
The yeast has exhausted its available food supply. The carbon dioxide production has stretched the gluten structure beyond its physical limit. The dough can no longer hold its own weight. Baking overproofed dough results in zero oven spring. The loaf deflates the moment it hits the baking steel and spreads out completely flat. The baked crumb will be dense and unappealing.
Recognizing Properly Proofed Dough
Perfectly proofed dough strikes a precise balance. The dough feels soft, aerated, and alive. When you execute the poke test, the dough springs back slowly. It leaves a very slight, shallow indentation. The yeast still has enough energy left for a final push in the oven. The gluten remains strong enough to trap that final expansion. This remaining potential energy creates optimal oven spring. That final vertical lift sets the open, airy crumb structure you want.
Mastering the Bulk Fermentation Phase
The first rise dictates the success of the final loaf. We call this stage bulk fermentation. It begins the moment you mix the yeast into the flour. Bulk fermentation establishes the foundational strength and flavor of the bread. You must monitor the ambient temperature closely during this period.
A common mistake involves judging bulk fermentation strictly by the clock. A recipe might instruct you to let the dough double in size for three hours. If your kitchen runs hot at 82°F (28°C), the dough will double much faster. If you wait the full three hours, you will severely overproof the dough. You must watch the dough, not the clock. Look for a domed surface. Look for visible bubbles forming against the sides of your mixing container. The dough should pull away from the edges cleanly.
Precision Temperature Control
You cannot always control the weather. You can absolutely control your dough. Professional bakers treat temperature as an active, calculated ingredient. You must measure the ambient temperature of your kitchen before you begin mixing any ingredients.
Use a digital probe thermometer to check your final dough temperature immediately after mixing. The friction from kneading adds heat to the dough. You must account for this mechanical heat. Use the water temperature to adjust the final dough temperature. Warm water speeds up a cold room. Ice water slows down a hot room.
Move the dough to a warmer microclimate if your kitchen drops below 70°F (21°C). An unlit oven with the interior light turned on provides a perfect, draft free environment. Find a cooler spot if your kitchen exceeds 80°F (27°C). A tiled floor, a basement, or the lowest shelf of your pantry will run several degrees cooler than a sunny countertop.
The Impact of Shaping on Final Proof
Once you finish bulk fermentation, you divide and shape the dough. The shaping process organizes the gluten strands into a tight skin. This outer skin creates surface tension. Surface tension forces the dough to expand upward rather than outward during the final proof.
The final proof happens in a banneton or resting cloth. The ambient temperature remains critical here. A warm final proof happens quickly. A cold final proof happens in the refrigerator. Retarding the dough in the refrigerator overnight slows yeast activity drastically. The cold temperature allows enzymes to break down complex starches into simple sugars. This extended cold proof creates deep, complex flavor profiles and heavy blistering on the baked crust. Cold dough also scores much easier with a lame.
If you choose a room temperature final proof, you must monitor the dough constantly. Execute the poke test every fifteen minutes once the dough visibly expands. The transition from perfectly proofed to overproofed happens rapidly at room temperature.
Consistent Results Through Tracking
Fermentation requires intense attention to detail. You must track your ambient temperatures. You must observe exactly how the dough behaves at different hydration levels. Record your mixing times, water temperatures, and proofing durations.
Baking relies on the scientific method. You will achieve consistent volume and a perfectly airy crumb every time you bake by eliminating variables. Log your temperatures, hydration percentages, and tactile observations in Foodofile. Tracking your specific data allows you to adjust your technique across different seasons. Summer baking requires completely different temperature management than winter baking. Build your knowledge base and trust the tactile feedback of the dough.
Sources and Further Reading
https://www.theperfectloaf.com/the-importance-of-dough-temperature-in-baking/
https://atlas-scientific.com/blog/how-does-temperature-affect-fermentation/
https://undergradsciencejournals.okstate.edu/index.php/jibi/article/view/8265
https://www.mashed.com/1155884/the-poke-test-to-tell-if-your-sourdough-is-overproofed/
https://www.theperfectloaf.com/how-to-use-the-dough-poke-test/
Ready to transform your kitchen?
Stop juggling screenshots, bookmarks, and cookbooks. Import recipes from anywhere and build your perfect digital recipe book with Foodofile.
Get Started for Free